
When Can You Castle? A Beginner Legality Checklist
Prepared November 5, 2026 · The Good Chess & Checkers editorial desk
You can castle when it is your turn, your king and the original rook on that side have never moved, the squares between them are empty, and your king does not start in, cross through or finish in check. Test one side at a time: a problem on the queenside does not automatically rule out the kingside.
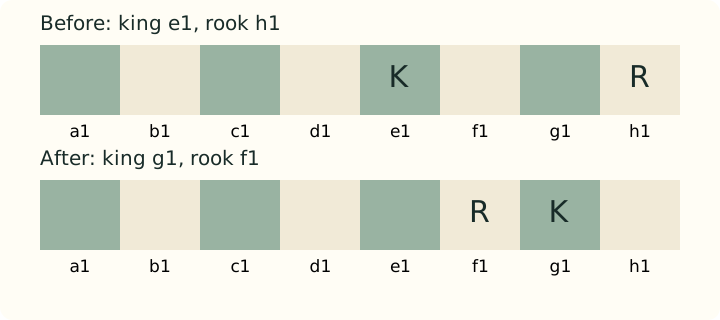
This guide covers standard chess from the usual starting arrangement, using the FIDE Basic Rules, Articles 3.8.2–3.9.2. It does not cover Chess960, event penalties or app controls. A legal castle is not necessarily the strongest move.
Stop at the first failed check
- Turn and pieces: is it your turn, with your king and the original rook on their starting squares? A replacement promoted rook does not restore castling rights.
- History: has the king ever moved? If yes, neither side is available. Has this rook ever moved? If yes, this side is unavailable, even if it came back.
- Clearance: is every square between that king and rook empty? Your own pieces and your opponent’s pieces both block castling. Castling captures nothing.
- Starting square: is the king currently attacked? If yes, you cannot castle out of check.
- Crossing and finish: are the king’s crossing square and destination safe from attack, with the king also safe in the final position? If either fails, do not castle on that side.
An attacked square is one an opposing piece threatens according to its capture pattern and the pieces blocking its path. Pawns attack diagonally, even when those squares are empty; knights can jump. An enemy piece pinned to its own king still counts as attacking squares for this check (FIDE 3.1.3 and 3.9.1). Use our chess piece movement guide if those patterns are new.
The four-row square worksheet
Files are the letters a–h; ranks are the numbers 1–8. White’s king begins on e1 and Black’s on e8. If you need help finding those squares, start with correct board setup. Kingside means toward the h-file rook; queenside means toward the a-file rook.
| Side | King move | Rook move | Must be empty | King safety squares |
|---|---|---|---|---|
| White kingside | e1–g1 | h1–f1 | f1, g1 | e1, f1, g1 |
| White queenside | e1–c1 | a1–d1 | b1, c1, d1 | e1, d1, c1 |
| Black kingside | e8–g8 | h8–f8 | f8, g8 | e8, f8, g8 |
| Black queenside | e8–c8 | a8–d8 | b8, c8, d8 | e8, d8, c8 |
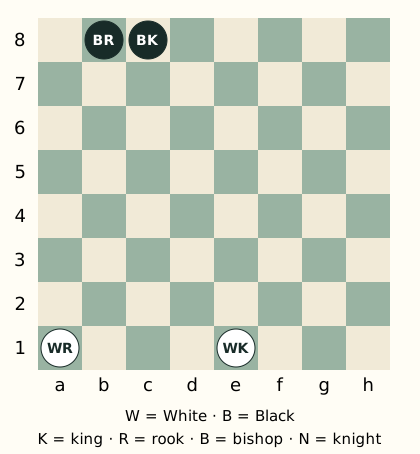
The b-file distinction: b1 or b8 must be empty for queenside castling because it lies between the king and rook. It may be attacked: the king never crosses it. The rook itself may also be attacked. The king’s safety squares, rather than every square the rook crosses, decide the attack test.
Which problems can change later?
A prior king or relevant rook move permanently removes the corresponding right for that game. Returning the piece does not undo its history. By contrast, a blocking piece can move away, and an attack can disappear. Having been in check earlier does not by itself remove castling rights; moving the king in response would. If you answered that check with another piece and retained all the other conditions, castling may still be possible later.
Unknown history means unknown rights. A picture of a king and rook on their starting squares cannot tell you whether they moved earlier. Check the game record or agreed exercise assumptions. Do not decide “yes” from an empty path alone.
Composed contrast positions: change one fact
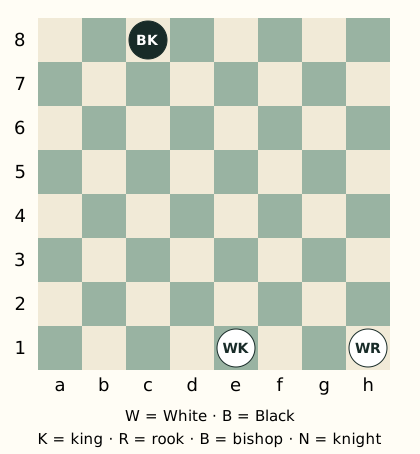
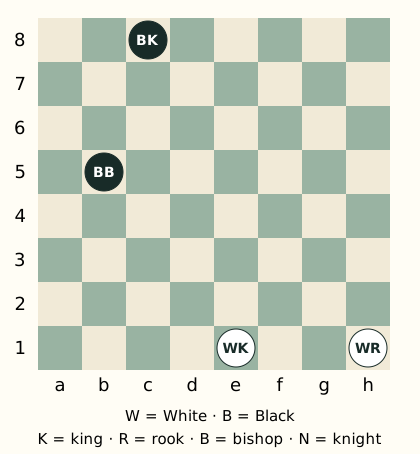
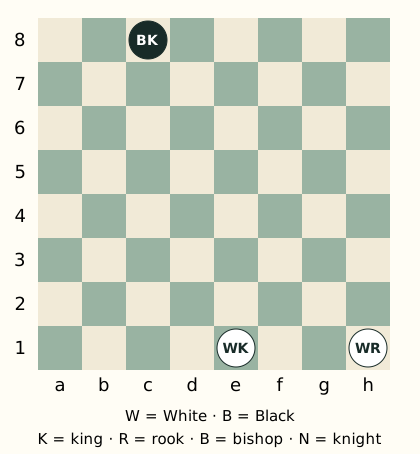
These are original teaching illustrations, not photographs or positions taken from recorded games. In every diagram it is White to move, Black’s king is on c8 and all unlisted squares are empty. White’s king is on e1 with the original indicated rook. Assume neither White castling piece has ever moved, except in H. Historical reachability is not established; the answers apply the checklist to the stated positions and history assumptions.
Diagram key: W means White, B means Black; K is king, R rook, B bishop and N knight. Compare A with B, then C with E. Read each answer after deciding which exact check passes or fails.
A: clear kingside
B: safe finish, unsafe crossing
C: b1 attacked but empty
D: the rook is attacked
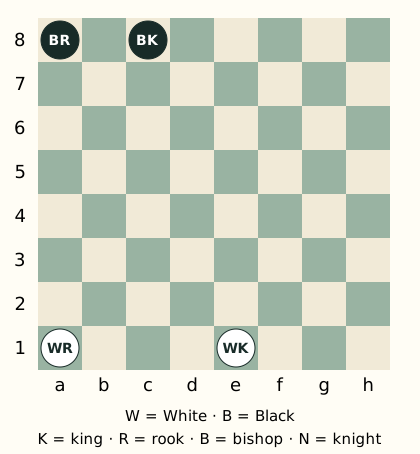
E: change C by adding a knight on b1
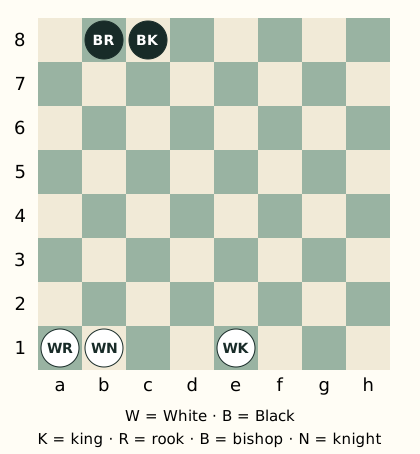
F: the king starts in check
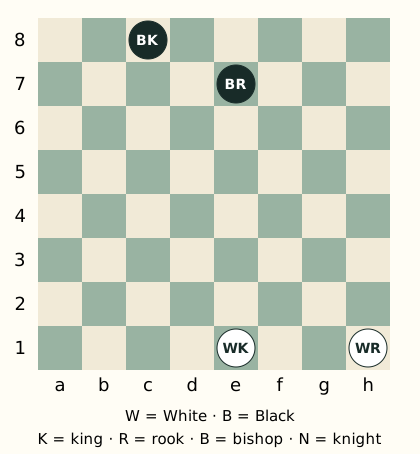
G: the destination is attacked
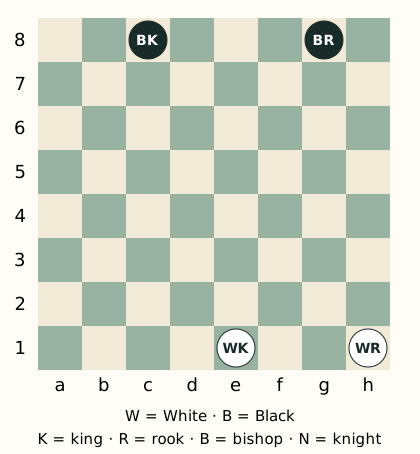
H: same board as A, different history
Use the checklist on a board you already own
Set up A and say “history, empty, start, cross, finish” while pointing at the relevant squares. Add the bishop on b5 to make B and trace its diagonal to f1. Then set up C and add the knight on b1 to make E. Finally keep A’s pieces in place but change the history to H: the same picture now gives a different answer. You do not need new equipment.
Copyable decision record
Color and side: ______ · King never moved: yes / no / unknown · This original rook never moved: yes / no / unknown
Required empty squares: ______ · First occupied square, if any: ______
King start / crossing / destination: ______ · First attacked square, if any, and attacking piece: ______
Decision: allowed / not allowed / history unknown · Exact reason: ______
If recording moves would help you settle history questions, see whether learning chess notation fits your casual games. If you want a small table reference for several beginners, compare rule cards with piece-identification cards; first try copying the checklist onto paper.
Rules source and editorial scope
Rules checked by direct retrieval on November 5, 2026 against the FIDE Laws of Chess, effective January 1, 2023: 3.8.2 for movement; 3.8.2.1 for lost rights; 3.8.2.2 for clearance and attacked king squares; 3.1.3 and 3.9.1–2 for attacks and king safety. The worksheet and composed diagrams are this editorial desk’s teaching aids, not FIDE illustrations or an endorsement. This is rules guidance, not an event ruling or strategic recommendation.
Prepared by The Good Chess & Checkers editorial desk with AI-assisted research organization and drafting. AI output is not rules evidence. No hands-on testing, player observations or engine validation is claimed. Learn about our publishing approach on the About page.